Programming with SOD - Getting Started Guide
Here is what you do to start experimenting with SOD without having to do a lot of tedious reading and configuration:
Download The Code
Get a copy of the SOD sources and compile them yourself. For easy deployment, all source files are combined into a single C file (The amalgamation) named sod.c and its accompanying header files named respectively sod.h, sod_img_reader.h and sod_img_writer.h. All you have to do is drop these files in your source tree and you're done (no need for a Makefile or a build manager for that).
SOD is written in C99 and compilation should be fine on most platforms (including exotic ones) with a modern C compiler (GCC, Clang, MSVC >= 2015, IntelCC with the -std=c99 compile-time flag). Visit the download page for more information or submit a support request if you have any trouble integrating SOD in your project.
The SOD C/C++ API
The SOD API is broken down into five independent categories:
- Convolutional/Recurrent Neural Networks (CNN/RNN) Interfaces which let you detect multiple objects at once on a given input image or video frame and are documented here. RNNs on the other side let you generate text (i.e. Shakespeare, Kant, Python code, 4chan, HN discussion, etc.) depending on the pre-trained model.
- RealNets which basically are container for various neural networks architecture that let you for example detect faces and extract their shapes at Real-Time on HD videos and are documented here.
- Image Manipulation & Processing Interfaces including but not limited to drawing, Hilditch thinning, canny edge detection, binarization, Hough line detection and so on and are documented here.
- Optional OpenCV Integration Interfaces documented here.
- Optional RealNets Training Interfaces that let you train your own RealNet models on a Modern CPU and are documented here.
This introduction course is divided into three independent parts. Feel free to start with whatever section you feel comfortable with:
- Detecting & classifying objects via the CNN/RNN interfaces.
- Real-Time object detection with RealNets.
- Advanced Image Processing & Manipulation.
Finally, all code samples listed here and many others are available to consult at the samples page and downloadable as a whole archive from the download page or the SOD GitHub repository.
CNN/RNN Interfaces
Below is a simple C program that demonstrate how to use the SOD CNN/RNN interfaces to detect multiple objects on a given input image or video frame.
For the sack of simplicity we'll only deal with images here as capturing video frames require integrating SOD with OpenCV or the underlying OS API which is beyond the scope of this guide. The output image should look like the following after calling the drawing interfaces to mark regions-of-interest (i.e. detected object) returned by the CNN.
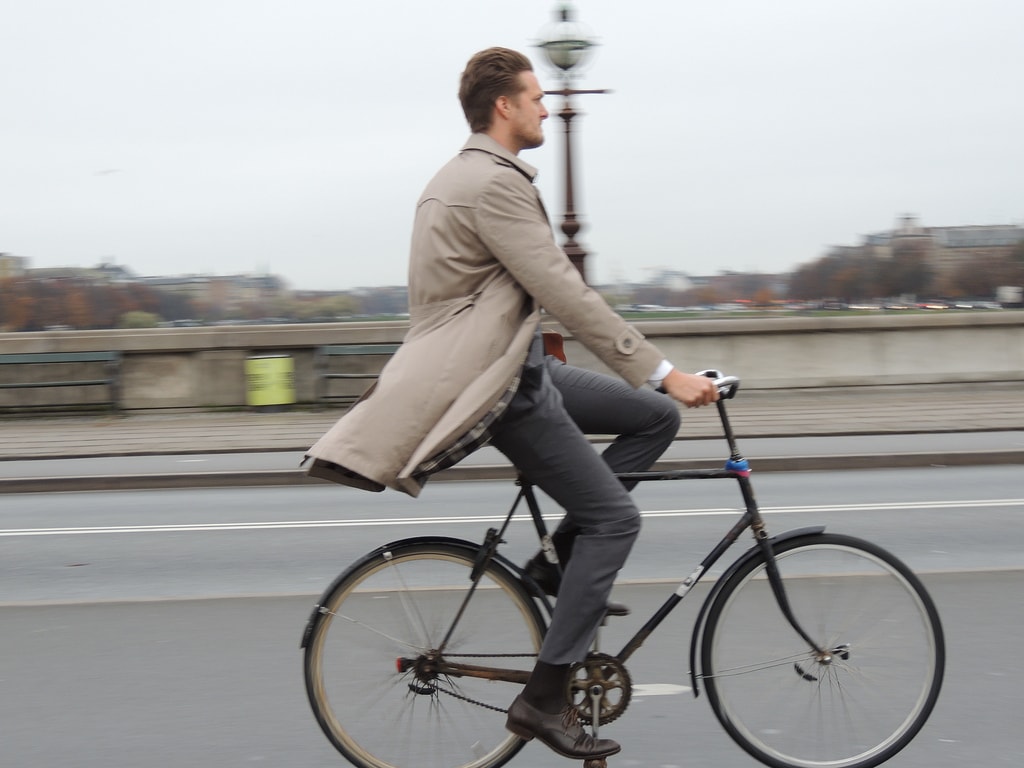
Input Image/Frame
Output Image
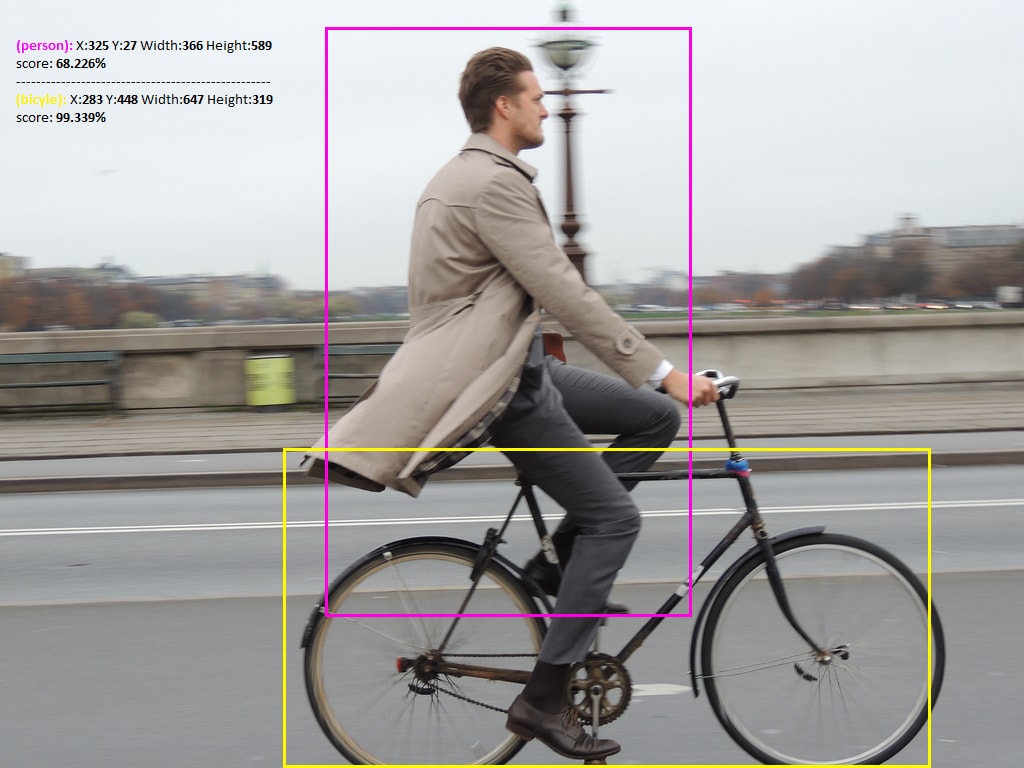 As expected, a person and a bicycle where successfully reported with high score detection by our CNN handle.
The Code
The code should be self-explanatory and easy to follow by the average C/C++ programmer. As expected, a person (68%) and a bicycle (99%) where successfully reported with high score detection ratio by our CNN handle. This was achieved using these straightforward steps:
- An image was loaded from disk first via sod_img_load_from_file() on line 40. Internally, each in-memory representation of an input image or video frame is kept in an instance of the sod_img object. Basically, a sod_img is just a record of the width, height and number of color channels in an image, and also the pixel values for every pixel. You can find more information about the sod_img object here.
SOD support major images format including but not limited to PNG, JPEG, BMP, PPM, PGM, PSD, etc. and you can load images from multiple sources including memory (i.e. received from network socket) via sod_img_load_from_mem(), from OpenCV IplImg via sod_img_load_cv_ipl(). You can even load an entire set of images from a given directory via sod_img_set_load_from_directory() or dynamically create a new one from your code using sod_make_image(). Dealing with video frames is quite easy especially with the OpenCV integration interfaces that you can use to catch frames and convert them back to a sod_img instance via sod_img_load_from_cv_stream(). - A sod_cnn handle was instantiated by a call to sod_cnn_create() on line 56. This routine expect you to specify the desired network architecture and a SOD weight file downloadable here. Built-in magic words such as :face :tiny :full :voc :rnn, etc. are aliases for pre-ready to use CNN or RNN architectures for object detection and text generation purposes. These magic words and their expected SOD weight files are documented here. This routine is often the first API call that an application makes and is a prerequisite in order to work with the CNN/RNN layer. You can find more information about the sod_cnn handle here.
- Next, before making prediction, we must prepare our input image or video frame. This involve resizing the image/frame to the appropriate network dimension where the result of this operation is a float vector that is passed verbatim to sod_cnn_predict(). This operation is always very fast and is done via sod_cnn_prepare_image() on line 80 of the sample.
- The detection process occurs on line 88 via sod_cnn_predict(). The prediction task vary depending on the network architecture. For a standard CNN, this involve an object detection & classification task while text generation is performed for a RNN architecture. This routine expect the input data to be analyzed as a float vector and its output (i.e. analysis result) is an array of bounding boxes holding the coordinates, score & class (name) for each detected object. Each entry of this array is represented by an instance of the sod_box structure.
- Finally, we consume the network output by reporting how many objects were detected which is done on line 90. We iterate through the bounding boxes array on line 91 and print each object name, coordinates and confidence threshold. A rectangle is drawn via sod_image_draw_bbox_width() on line 97 to surround each region of interest but one could draw a circle via sod_image_draw_circle(), crop the entire region via sod_crop_image() or simply record these coordinates in any format the host application is dealing with.
- Optionally, the output image is saved on disk via sod_img_save_as_png() on line 102 and clean-up is done via sod_free_image() and sod_cnn_destroy() on line 104 through line 107.
- You are aware that a CNN is a memory & CPU hog. The smallest CNN detection model consume about 75 ~ 160MB of RAM at run-time so expect to handle memory failure on devices with limited resources (i.e low-end mobile devices). That's why in certain cases, using RealNets for detection purposes is more appropriate as we'll see in the next section.
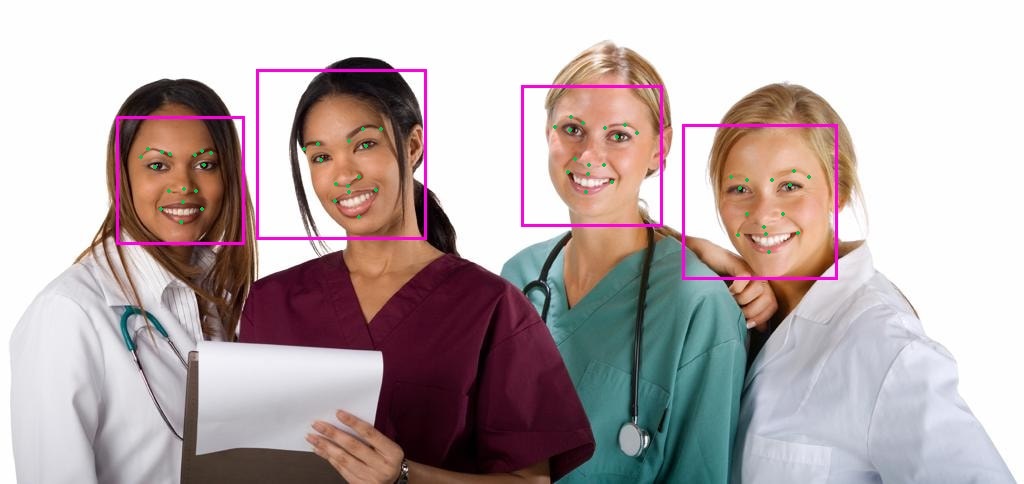
This logic is always same regardless of the target CNN model. For example, Real-Time, multi-scale face detection is achieved via the same code as follows

Real-Time multi-scale face detection
As you can state, only the architecture magic word changed from :fast to :face on line 55 and the pre-trained model from tiny20.sod to face.sod for us to perform multi-scale face detection. We move now to the next section to introduce a brand new, completely different architecture.
RealNet Interfaces
Let's tackle the interesting case of RealNets. Basically put, RealNets are simple container for multiple neural networks architecture and were introduced to the public in the first release of SOD. By taking advantage of each network architecture since most of them are specialized (i.e. CNNs for object classification, ANNs for pattern extraction and so forth) and stack one network on top of another, one could achieve amazing results. For example detecting & extracting facial shapes has never been easier and quick (few milliseconds) by stacking up together in a RealNets container a set of decision trees and a simple Artificial Neural Network. Below is a simple program that demonstrate how we detect frontal faces at Real-Time using few RealNets API calls and a pre-trained model.
Frontal face detection using RealNets
The Code
Working with RealNets is straightforward and require only few calls:
- A sod_realnet handle was instantiated by a call to sod_realnet_create() on line 41. This routine is often the first API call that an application makes and is a prerequisite in order to work with RealNets. You can find more information about the sod_realnet handle here.
- Next, a pre-trained RealNet model was registered via a call to sod_realnet_load_model_from_disk() on line 48. In our case, the model is a frontal face detector specialized in HD video tracking and is available to download from pixlab.io/downloads. You can also train your own model on your CPU via the RealNets training interfaces just by providing the required datasets (i.e. positive and negative samples). Notice that you can stack up as much models as you want and perform detection on multiple objects and thus mimic the CNN behavior with a fraction of overhead thanks to the flexible RealNets architecture.
- An image was loaded from disk in the grayscale color space via sod_img_load_grayscale() on line 51. Before detection, we need the raw grayscale pixels available as a stream of unsigned characters. This is done on line 63 via sod_image_to_blob().
- Real-Time detection occurs on line 72 via sod_realnet_detect() by just passing the raw grayscale pixels. The output is an array of bounding boxes holding the coordinates, score & class (name) for each reported object. Each entry of this array is represented by an instance of the sod_box structure.
- We consume the RealNet output by reporting how many objects were detected on line 75, we iterate through the bounding boxes array on line 80, print each object name (i.e. face), coordinates and confidence threshold and finally we draw a rose rectangle on each entry via sod_image_draw_bbox_width().
- Finally, clean-up is done via sod_free_image(), sod_image_free_blob() and sod_realnet_destroy() respectively on line 88, 90 and 91.
Image Processing Interfaces
SOD ships with a set of advanced image manipulation algorithms found to be useful in various fields including but not limited to genetics, biometrics, Augmented Reality, content extraction & filtering, etc. Let's name a few:
- Canny edge detection via sod_canny_edge_image().
- Hilditch Thinning via sod_hilditch_thin_image().
- Connected component labeling or Blob detection via sod_image_find_blobs().
- Sobel operator via sod_sobel_image().
- Hough Lines detection via sod_hough_lines_detect().
- Histogram Equalization via sod_equalize_histogram().
- Morphological operations including sod_erode_image(), sod_dilate_image(), etc.
- color space inline conversion things like YUV to HSV, RGB to HSV, BGR to Grayscale and so on implemented in sod_img_hsv_to_rgb(), sod_img_yuv_to_rgb(), sod_img_bgr_to_rgb(), etc.
- Otsu's binarization via sod_otsu_binarize_image() plus over 80 image/frame processing interfaces documented here.
Below a few image manipulation samples. The code samples ZIP archive is to be downloaded from pixlab.io/downloads.
Canny Edge Detection [sod_canny_edge_image()]
Hilditch Thinning [sod_hilditch_thin_image()]

Sobel Operator [sod_sobel_image()]

Blob Detection [sod_image_find_blobs()]

Hough Transform [sod_hough_lines_detect()]
By taking advantages from each of these image processing routines, one can achieve smart results in just few lines of code as the following frontal license plate detector using only sod_image_find_blobs(), sod_canny_edge_image(), sod_threshold_image() and sod_dilate_image() without deep-learning or complex stuff.


Frontal License Plate detection
Notice that we did not explicitly mention the standard image processing routines like resize, rotate, flip, crop, equalize, raw pixels access, color space conversion and over 80 interfaces that you should take a look at if you want to move forward with the SOD image processing layer.
Conclusion
Well, that was the tip of the iceberg. As you may state, the real power of the SOD API come to evidence when you mix both analysis (i.e. CNN or RealNets) and processing (i.e. Image/Frame manipulation) calls from your code. You can achieve amazing results including but not limited to as we have seen:
- Real-Time license plate detection.
- Mimicking the famous Snapchat filters.
- A minimalistic Gimp/Photoshop clone.
- Identify & extract potential bloc of texts (i.e. bank notes, subtitles, etc.) without deep learning.
With more than hundred of exported functions and growing, continuous improvement. The SOD C/C++ API documentation provides detailed specifications for all of the various exported C/C++ interfaces. Once the reader understands the basic principles of operation for SOD and want to move forward, that document should be used as a reference guide.
The download and samples pages plus the Github repository is where the samples mentioned in this article are located. Feel free to download, compile, modify & run those code at your ease. Finally, if you have any trouble integrating SOD in your application, don't hesitate to reach the SOD developers via our numerous support channels.